 86% of businesses use video as a marketing tool which is a 41% increase since 2016. This means that everyone is now aware of video marketing and is attempting to engage with it at some level.
The problem is that many companies have limited in-house experience, which leads to a fear of creating original content that won’t look professional or will take too much time to produce. Lucky for you, this post will solve that problem.
There are many types of videos you can create, but we will be looking specifically at vlogging (which is a shortened version of the word video blogging). We’ll look at a practical way to get your vlog up and running for minimal upfront costs, and show how to do it without years of video production experience under your belt. If you haven’t already defined your purpose or target audience for your vlog content, make sure to download our Marketing Survival Guide. This will help you better understand your buyers and develop messaging that resonates. All things you need for a more effective vlog.
Step 1 - Script
All great videos start with a great script. It’s important to write out what will be said so that you can plan what you want to show during each part of the video.
This will allow your graphic designer to get started on any graphics needed before you even start recording. It will also help you think through the location for each part of the video. Maybe it can all be done from a single location in your home/office or maybe you’ll decide that the cool mural outside would make a great background instead.
By writing a script first, you’ll have an easier time knowing what visual elements you’ll want to include in the video. To help you in the planning process, I’ve included a Vlog Script Template.
PRO TIP: Practice before you record. You will find that some of your script doesn't work in a conversational format. Memorize the main points and don't worry about reciting them verbatim. If that's just not possible for you, then there is teleprompter software you can use if that would make you more comfortable. Some are even voice-activated so that it scrolls automatically with you. Teleprompter Mirror is a free teleprompter software you can use in a browser.
Step 2 - Camera
Technology has come a long way for digital cameras, but now your smartphones, tablets, and even webcams have high-definition resolution that will produce a quality video for your vlog. One thing to keep in mind is how you will be distributing your vlog. If it will primarily live on the web and consumed on laptops and mobile phones, then you can get away with a resolution as low as 1280x720. If you plan on it being consumed on a television or large screen, then your camera needs to be able to record at 1920x1080 at the least.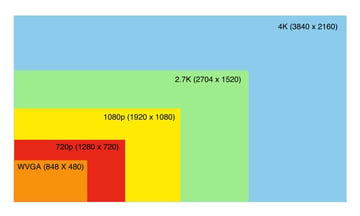
If you are in doubt of the quality of your recording device, here is a list of tablet and smartphone resolutions that you can check to make sure your device is capable. Otherwise, just google your device and recording resolution.
Other devices can be used as well and if you have questions about something you might already own, please comment on this post.
PRO TIP: If you have access to a 4K recording device like one of the newer iPhones or Samsung Galaxys, record yourself waist up and don't stop recording even if you mess-up. You can go back and edit out your mess-ups in post-production and then zoom in on the shot tighter around your face and upper torso so the video still flows naturally and solves awkward jump cuts.
Step 3 - Tripod
This step is mainly about having your recording device at eye level. Tripods just happen to be the best at doing it. Since most vlog videos will not require you to move the camera during a shot, a fluid head for your tripod will not be necessary and will save you a lot of money.
If you look on Amazon, you can find plenty of tripods with smartphone and tablet adapters sold together for $20 - $50. A good example of one is this mini flexible tripod so it can be set up anywhere. If you want to be standing up when recording your vlog, then I recommend getting a full-size tripod. Look for one that can extend to your height.
If you are just sitting at a desk and using a webcam on your laptop then put some books or a box under it until the camera is eye level.
PRO TIP: When using a full-size tripod always extend from the top first. Using the thicker parts of the tripod legs ensures optimal stability. Also, if your recording device has image stabilization, turn it off. It will save you battery life and you don't need it when it's on a tripod.
Step 4 - Lighting
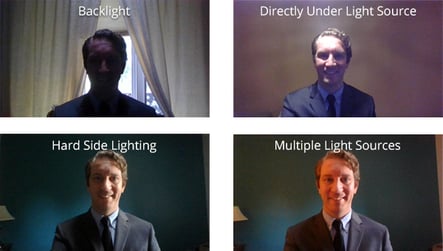
Lighting is one of the most important elements to think about, and most people get it wrong. The examples to the right are the most common lighting issues you have probably seen already, but with a few tweaks, you can get great lighting.
You can find lighting kits of all kinds online at a wide range of prices, but for simplicity, you can use a free lighting kit -- the sun. If you decide to shoot your video inside, be sure to shoot near a window and make sure your subject is not in direct sunlight. Just having indirect lighting from a window will be more than enough. 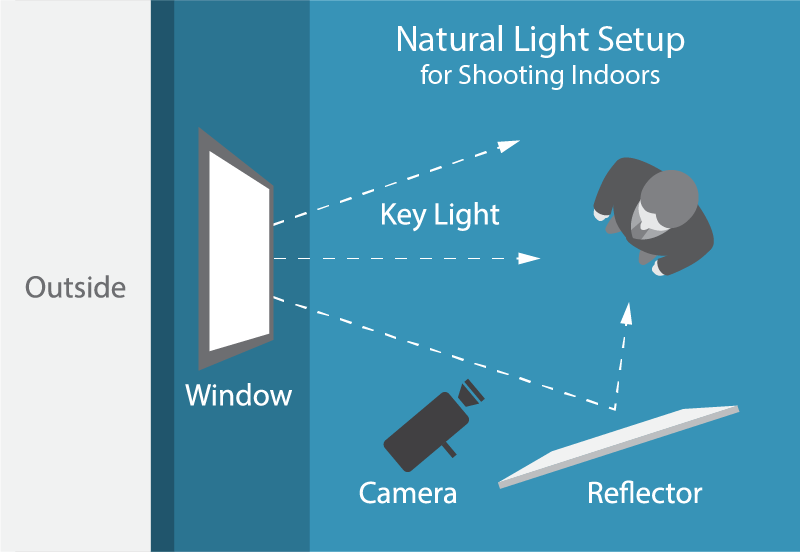
As shown in the diagram, the majority of the light source should be behind the camera. This is called the “key light.” Then have a person with a large piece of white poster board reflect this key light to the darker side of the subject’s face. This is called a “fill light.” If you don't have someone to help, then you can use painter's tape to fix a reflector onto a lamp or other object that you can adjust. Painter's tape is recommended since it won't damage whatever you apply it to.
If you want to use a lamp as the fill light instead. Then just change out the bulb for a light that is rated for "daylight" or 5000k color temperature. Try to use a lamp with a lampshade as it will act as a natural diffuser.
If you can't use daylight and you don't have space to set up a light kit, then consider getting a ring light. They aren't perfect on their own, but they are better than nothing and can act as a good fill light when you do have natural lighting. Just make sure to buy one that you can adjust the color temperature so that it works in any lighting situation.
PRO TIP: For darker skin tones, a warmer light is more complementary, so consider buying a poster board with a gold metallic side. The reflected light will give off the desired effect. You can also buy a foldable reflector that has a golden color option.
Step 5 - Audio
Microphones are more readily available and can range from $20 to over $400. The reason for the vast range has more to do with the type of setup and quality you need. here is a list of some of the best vlogging microphones from Vlogger Pro.
The first thing to decide is if you will be recording with a mobile device, DSLR/camera, or computer. The reason this is important is that it determines what kind of plug the microphone you're using needs to work.
Next, decide on the setup for your vlog. Will it be you talking at a desk? Will you be standing? Will more than one person be talking? Thinking through these scenarios will make sure you are prepared for whatever you need.
Now let's look at three types of microphones to determine what will work best for your environment.
Lavalier Microphone (Omnidirectional)
A lavalier mic is an omnidirectional microphone that is the easiest to understand as it has a pickup pattern of 360 degrees directly around the microphone. You can get a wired one that plugs directly into your recording device, or you can get a wireless one in case you need to be further away, or if you want to easily connect multiple microphones.
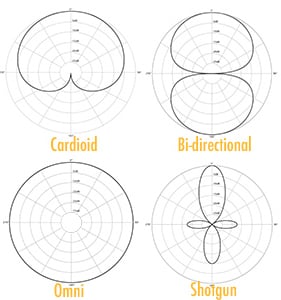
The downside is if you move around a lot, the microphone will capture the sound of your clothing rubbing together and it picks up sound from everything. This option is best when you need the most versatility for multiple situations.
Shotgun Microphone (Uni-Directional or Supercardioid)
A shotgun mic can be used in just about any setting. The pickup pattern of this type of microphone amplifies whatever you point it at while canceling the sound waves that come from other directions.
A uni-directional pattern usually requires assistance to monitor the audio since the pickup pattern is so narrow, but a supercardioid is still directional but with a broader pickup pattern. If you need to be able to isolate your audio, then this is your best option.
Condenser Microphone (Cardioid or Bidirectional)
Condenser mics are what you often see radio hosts use or singers in a recording studio. It's the most sensitive mic because it picks up the most details in your voice. That is why you see screens in front of them. Those are called pop filters. They reduce or eliminate fast-moving air on the microphone from plosives when recording. If you want the best quality audio and can create a pretty quiet surrounding, then go with this option.
PRO TIP: If you're recording device has AGC (Auto Gain Control) as an option, turn it off. You don't want the camera to adjust the audio in real-time because it will turn up the gain during any pauses in your video and you'll get terrible background noise. Take the time to manually set your audio level. When testing, you want the audio bars to hit the top of the green level when talking.
Step 6 - Editing
When you are finished capturing the video and audio it is time to edit the video together. iMovie is the easiest option, if you are a Mac user, to edit your vlog. You can find tutorials all over, but to save you time check out “iMovie 2020 - Complete tutorial for Mac."
If you use Windows-based devices, then I would recommend looking at VSDC. It’s a free video editing software with a small learning curve. There are some helpful documents to get you started. Another widely accepted option for Windows users is Movie Maker by Microsoft which also has a free version.
PRO TIP: If you want an easy way to create an intro to your vlog without having to use professional software, consider using Canva. They have a free intro maker.
Step 7 - Video Hosting
The most popular free video hosting site is YouTube and the fact that you've heard of it is almost reason enough to use it. However, there is also a paid hosting site called Wistia that should be given some consideration. Here are some quick advantages of each one and a comparative article you can read.
YouTube
- It’s free
- The second most-used search engine to Google
- Everyone knows it and uses it
- A great backlink to your company’s website that can help your SEO
- Videos can be easily shared and embedded on other sites
Wistia (free to get started / $99 per month for Pro License)
- High-quality videos with multiple resolutions
- Includes a lead generation form that works with popular CRM & marketing automation
- Allows custom calls to action
- Video supported SEO
Bottom line, YouTube is where you want to be if you need to have the greatest reach with massive amounts of impressions. Wistia is the best choice if you want to drive traffic to your website, increase engagement and have the budget for it.
PRO TIP: Use both. Each platform works very differently and yield their own benefits. By using both in collaboration you can not only gain the brand awareness and backlinks of contacts to your site with YouTube but then keep them engaged on your website and capture leads through Wistia.
Now you are ready to start your B2B vlog. If you have any questions please let us know in the comments, and if you have any tips and tricks you use for your vlog feel free to share - and don't forget to download our free vlog script below!
Editor's Note: This post was originally posted in October 2016 and has been completely revamped and updated for accuracy and comprehensiveness.


