 I’ve had my share of interesting experiences with HubSpot’s workflow tool. Some rookie mistakes, some company wins, and some downright mysterious occurrences. But one thing is for certain, the workflow tool is showing an impressive return on my investment of time in learning how to leverage it.
While growth experiences are wonderful, inbound marketers are very busy. So, I’ll show you how to bypass or troubleshoot challenges to get to meaningful help.
Here are tips to get you up and running using HubSpot’s workflow tool to improve segmented lead nurturing and email marketing for B2B.
Workflow example: "Welcome to our blog"
Let’s use a simple workflow example: we’re sending a follow-up “Welcome to our Blog” email to new contacts who subscribe to our blog. This email is designed to nurture the contact into downloading a popular asset, then requesting a demo (free idea at no charge).
1. Automated triggers
Using HubSpot’s workflow tool, each step will begin once an action has taken place. These are called triggers. There are multiple trigger options in HubSpot including:
a. Standard
This is triggered by a contact’s time of enrollment. For example, if a contact joins a list (such as filling out a form to subscribe to a blog) they would automatically be enrolled in the workflow.
b. Fixed Date
In this instance, a workflow would be triggered by specific calendar date. This option would be great for scheduled events like webinars, upcoming conferences, or even a nifty “happy holidays” email to your clients.
c. Property-based
This option is a more targeted and specific. For example, if you wanted to reach out to all contacts that have not visited your website in a month, you could use this trigger to be based on the property “time last seen”. Then, you can set your workflow to send a personalized “Haven’t seen you in a while – here’s some awesome blog posts you may have missed” email to contacts thirty days after the date they last visited your website.
2. Too busy to brainstorm? Use HubSpot’s recipes
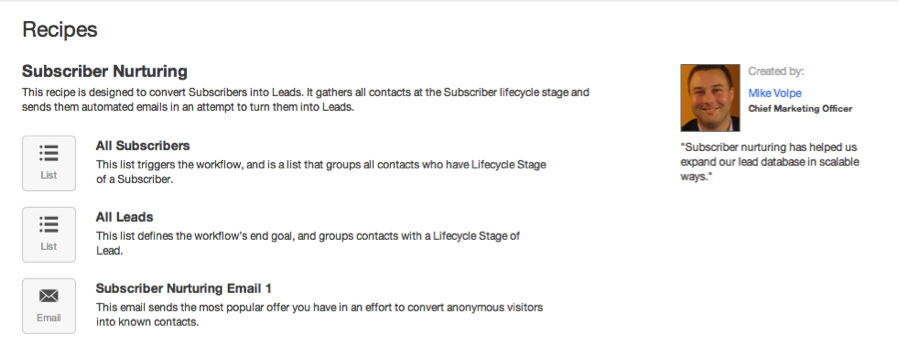
Any active digital marketer knows there are many moving pieces when managing an email marketing campaign. HubSpot knows too, which is why they provided different types of workflow “recipes” to meet marketing objectives. These are pre-made, goal-specific workflows that can be installed directly in your HubSpot portal.
Each recipe also lists what it will do. For example, if you wanted to use the subscriber nurturing recipe, it would create a starting list, a goal list (as mentioned earlier), two emails, and a complete workflow to help turn contacts into leads.

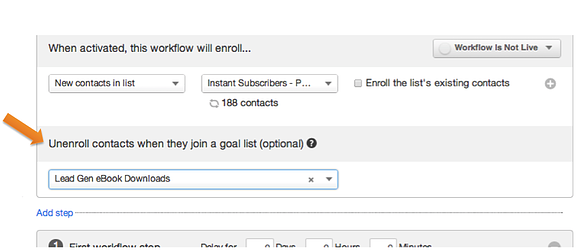
3. Un-enroll contacts when they join your goal list
If a contact takes a specific desired action like filling out a contact form, you can remove that contact from the workflow they are in and take the next step to reach out directly. So with our example, let’s say a contact has subscribed to our blog and found themselves back on our website that is packed with useful, compelling content; they’re feeling decisive and proceed to fill out a form to request a demo. Since the contact reached the end goal of the first workflow they were in, they will be automatically pulled from that list and will no longer receive emails from that workflow.
This keeps email engagement fresh by keeping your prospects or customers from receiving emails with repeat calls-to-action that they have already taken. 
4. Comb through your workflow settings
There’s flexibility in your workflow settings and there are different ways to set them up to function. The key is to build a strategy around your contact list based on your analytics and the behaviors of your buyer personas.
For instance, if you’ve noticed that most contacts open your emails after lunch on the weekdays, set your workflow so all steps are executed between 1-3pm on business days only.
5. Test your workflow
HubSpot has the ability to test your workflow prior to activating it. It’s similar to sending test emails or previewing a blog before publishing. With this option, you can select a contact from your database (preferably yourself or a pair of fresh eyes in your organization) that will receive the test workflows.
Once a contact is selected, all steps will be executed instantly for them to experience. This will provide more perspective from the prospect or customer point-of-view. This is a sure-fire way to gain a better understanding of the impact of your emails, and provide the opportunity to fine-tune your workflows and emails with last minute changes.
6. We’re live! Time to stalk workflow performance and history
In the Performance section of the workflow tool, you can view the analytics for each email - from the number of emails delivered, opened, and clicked, to contact churn and email bounces. In the History section, you can see what stage each contact is at in your workflow and when the next step is scheduled to be executed.
There are even more options to consider when creating and implementing a workflow on HubSpot’s new tool, but we’ve armed you with some key “how-to” strategies to get you started. Workflows can help organize and segment your email marketing, and using them strategically can help your organization take email marketing to the next level.
Feel free to share your experiences and lessons learned with the workflow tool in the comments below.
And before you dive into new workflows, click below to learn how to craft effective, lead-generating emails from subject lines to Calls-to-Action!


